Exploring Sitecore XM Cloud Forms: A Comprehensive Overview

The most awaited news came from Sitecore about the release of XM Cloud Forms.
Previously Sitecore enthusiasts / Marketers used different ways of forms implementation in Sitecore to reach the target customers like
- WFFM (Web Form For Marketers)
- Sitecore Forms
- Embeddable Forms Framework(EFF)
XM Cloud Form is the latest addition by Sitecore and especially used to create Forms on XM Cloud pages.
It will only work with the latest version of Sitecore JSS (21.6)
Note: I have tried to use XM Cloud Forms in my local docker setup by cloning the starter repo, but I couldn't see the option of Forms in the XM Cloud dashboard to get started.
Lets explore together on the features of Forms.
- Similar to Sitecore Components, we can navigate to https://forms.sitecorecloud.io/ to start creating the Forms
- There are 2 important tabs in creating Sitecore Forms
- Forms
- Webhook(for triggering the submit action)
- We can create, modify, delete, and activate the form from the Form tab. Once the form is activated it can't be modified or deleted.

- We have out of box template library from there we can choose our templates to easily get started, or we create forms on our own using various layouts and controls available based on our requirements
- We can store our form as the template to the template library for future use to easily get started.
- In the Form Designer, we have 3 section
- Layout (we can use different layouts matching our design)
- Items (We can drag-drop different controls like
- Email (Validation is provided by Regex)
- Phone
- Short Text
- Long Text
- Select
- Multi Select
- Date
- Number
- Radio
- Checkbox
- Check Box Group
- T&C Checkbox
- reCAPTCHA( automatically taken care, we no need create domain in google and provide keys for this to work)
- Image
- Text
- Social Media
- Spacer
- Styles(if we need to follow any common style for control)
- There are 5 important tabs available to build and configure Forms
- Edit
- Comments
- Preview
- Versions
- Settings
- Edit:
- Forms will be created as Pages in the Designer by clicking Add page, by default first page will be already created, we need to create a page to have multi-step forms.
- Each Page should have an Action Button to navigate from one page to another and in the final Page based on our requirement we can trigger a webbook.
- The form needs an Action button (Submit button) before activating it else an error will be thrown.

- We can add a maximum of 10 pages only
- We can configure relevant properties or styles for the controls that we use in the designer.
- Comments
- This feature is important for the marketer to verify that the Form is designed as per the business requirement and is customer-focused.
- Form can be reviewed by the Marketer / Developers / Business to provide their comments, and necessary steps to be taken and resolve it.


- Preview:
- Before activating the form, designer can verify the form in different modes (Desktop, Tablet, and Mobile)
- Also, he can verify the form submission and make sure that the configured webhook passing data properly to the API
- Versions:


- Settings:
- We can configure Success and Failure content in the Form using the Settings Tab.
- Attaching the Webhook to the Form's Action Button can be achieved.
- There is a field called Form ID, which will help to uniquely identify and load forms into the web pages even though there are multiple forms placed on the page.
- While adding the Forms to by Sitecore Page, this will used to add multiple forms in the same page.


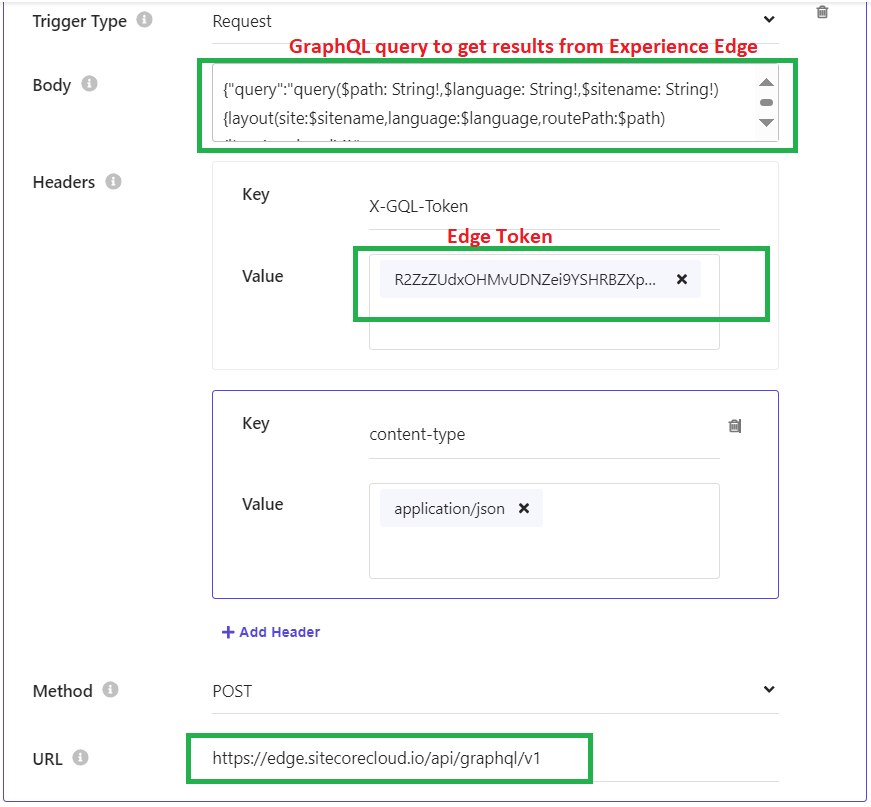
- Configuring Webhook:
- Webhook is important to perform the submit action to any external system API to process the user-submitted data, This data can be pushed to CDP, etc.
- Sitecore XM Cloud does not store the user-submitted data in any of its databases.
- We can configure only one Webhook for a Form on the Action button.
- To map the data with the API model, every control has a "Name" field box, we need to update the relevant API parameter name so it can be passed to API properly.
- Webhook can be easily tested before and after activating the Form.
- Webhook configuration is always available for editing, even though it is attached to any Form which is already been activated
- Webhook provides different types of Authentication to communicate with the API.
- OAuth 2
- Basic
- API Key
- No Authentication

- Sitecore Form will automatically detect what message needs to show either success or failure based on the HTTP status code (2xx,3xx,4xx,5xx, etc), If the status code is 2xx it provides a Success message and for other status codes it provides a failure message.


- Documentation Site:

- Adding Forms to Sitecore Pages
- Once the form is created we can add the form to the Sitecore item from Sitecore Page.
- Only the activated Forms will be available from the Components Tab of Sitecore Pages.
- Drag-drop the forms to items from the Sitecore Pages.


- Some observation
- Form Controls not support Rule-based hiding and showing.
- List controls like Select, Checkbox Group, and Select do not map directly from the datasource.
- We can't select the Image path directly from Sitecore.
- Uploaded images automatically converted to .webp file format.
- User submitted data are not stored in XM Cloud Forms.
- Form abandon details were not collected and provided like it is been there from Sitecore Forms.
- Custom validation is not done directly at present.
- Multiple Webhook support on a single Action Button is not available.
- Triggering javascript action from the button or any control is not available.
Thanks to the Sitecore team for providing this tool, I hope many more new features will be incorporated into this Form soon and it will help us in our journey.
Let's learn and grow together, happy programming 😊


Comments
Post a Comment